
Showing posts with label Blogger tutorials. Show all posts
Sunday, 4 November 2018
How to rename Blogger label

Blogger offers an enjoyable easy-to-use Label management area Located at Posts >> Labels. Through this option, you can manage, edit or can even quickly delete labels with just few clicks. There is a straightforward way to add/ Remove or rename Labels.
The first thing you need to do is to select a certain label from the “Label Value Area”. On selecting, it would show up all the articles filed under certain Label. Check out the following screenshot for details.

You need to select all posts through the check box allocated next to the title of your posts. After selecting the posts properly, press the “Label action button” present just above the list of your posts. On pressing it a drop down window will appear, select “New Label” and enter a fresh label name which you want to give to your selected posts. Once done, press the OK button to conclude.
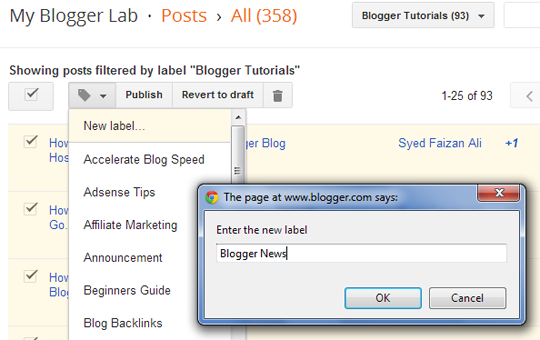
After adding a new Label, you would surely want to remove the old one so again select all the posts through the check box present beside the title of your post. Again select the “Label action button” and from the list of your all labels scroll down to the one which you want to remove and just select it and Bam.

Congratulations, your posts are successfully moved to a new label. Now whenever you will try to access your old label it would display a 404 error, which means it is properly moved to a newer location.
Precautions:
- You can edit up to 50 posts at a time. If you selected more than 50 posts then, it would probably show you some errors.
- Make sure you are selecting the correct Label to edit because if somehow choose a wrong one it might mess up everything.
- Labels have nothing to do with SEO because they are neither get index nor shown in the Search results so renaming, moving or adding a new category would not show any impact on your Search engine traffic.
Why Blogger has Better SEO Options Than any Free Platforms
While choosing a perfect blogging platform people always questions about one thing, does it is better for SEO? The half of the world prefers Blogger while the rest recommends WordPress but ultimately both has their own pros and cons. People always think Blogger is not a suitable platform to create a professional website, mainly because it does not provide flexible options to optimize your site for SEO. What most people don’t know is that Blogger is probably the simplest and most powerful platform and it also has decent SEO score. In this article, I will provide an in-depth detail Why Blogger is better than WordPress or any other free platforms in Terms of SEO? In the end, we will also reveal what Matt Cutts thinks about Blogger SEO.
What Option Does Blogger Offers for SEO?

Custom Permalink Structure:
By default, blogger provides constructive permalinks. In spite of all this, blogger also offers a robust option to choose custom URL (permalink) for your posts. You can choose select few keywords and can use them in your URLs so that it can generate decent organic traffic from search engines. However, keep in mind stuffing your permalinks with many keywords would decrease the weightage of your keywords altogether. The more keywords you will add in the permalinks, the less will be the keyword weight and hence, its relevancy would be lower in the search results.

Separate Meta Description for Posts:
When you are searching anything on Google, you always see a piece of text line just beneath the search results. Those lines are there to help you to determine whether that’s the site which you were looking for. If you would not specify a Meta description, search engines will automatically establish a description for you based on your site’s content. Fortunately, there is a handy tool in blogger located at Settings >> Search engine Preference which enables you to specify separate Meta descriptions for your site’s content.

Custom Redirects Functionality:
What would you do, if you want to move your content from one URL to another? You would prefer to use a 301 Permanent redirect so that all the PageRank juice transfers from one page to another. Without pointing a redirect, there is no way you can recover the loss. Blogger also has custom redirect functionality which helps you in redirecting URLs to any page. This tool can be accessed through Settings >> Search engine Preference >> Custom Redirects.

Customizable Not Found Page:
Blogger often creates a custom 404 not found page to provide some sorts of comic relief to their readers, and protects them from seeing unfriendly or unentertaining error messages. If you have a broken link on your blog, or a reader navigated to a link which was temporary down then the custom 404 not found page would assist them in finding the content which they were looking for. You can customize your error page from Settings >> Search Preference >> Custom Page Not Found.

How to Rank Well in Search Engine?
Build Real Backlinks:
The most significant thing you need to rank well in Search engine is Backlink. No, I am not talking about tons and heaps of backlinks because a few bunch of quality backlinks could take your site from ground to the heavens. It doesn’t matters whether you are using WordPress, Blogger or any other platform, without having a decent amount of backlinks your site cannot rank well.

Writing Fresh Content:
Writing fresh and unique articles is another way to divert the attention of your visitors. Now you might be thinking how a piece of content would help you in ranking? Why People always prefer to write fresh and high quality content? Search engines don’t know the difference between a high quality content and low quality content. They always analyze the number of quality backlinks that the content is getting from other sources and hence labels it as Quality content. For Example, you write an article which was so exclusive that a person decided to write on the same topic with a credit link back to your website.

What People Thinks About Blogger SEO?
About few weeks ago Google’s employee and the head of web spam team Matt Cutts posted a video on YouTube answering some SEO questions about blogger.
Here’s the question:
Here’s the Answer: Blogger is quite straightforward to get started, and it is in the cloud. You don’t need to download or install any software yourself. On the other hand, if you install software yourself like WordPress, then you are usually not patching it, so it is easier to get hacked. If you are just doing spontaneous blogging and just starting out then Blogger is fantastic.
Blogger can work very well in terms of ranking well for search engine. If you get decent links and if you have excessive content then, it is absolutely the case you can rank well on blogger. You must give it a try because blogger can work exceedingly well with SEO
Blogger can work very well in terms of ranking well for search engine. If you get decent links and if you have excessive content then, it is absolutely the case you can rank well on blogger. You must give it a try because blogger can work exceedingly well with SEO
Conclusion:
It is just a matter of fact that how well you write and present your articles. Platform does not matters a lot because we commonly see many HTML based sites ranking way quite well in the search engine. Those sites are ranking well just because of quality backlinks and content not because they are using WordPress or any other platform. Stop regarding Blogger for unfriendly SEO options because they are way better than any other platform even WordPress. If you like this article, then feels free to share it with your friends on Facebook and twitter.Recover Your Posts? How to Restore a Deleted Post in Blogger

Recovering your deleted posts or pages from Blogger may appear to be a challenging task. Since, all the data is under Google’s ownership. Therefore, it’s difficult to recover your database through Hosting or any other service. Furthermore, Blogger do not have any recovering functionality it only allows to backup your Posts and Comments. Fortunately, there is a method through which you can easily get back your all deleted posts and pages in seconds. Today, in this article we will show you how to recover Your All posts or Pages in Blogger.
There are numerous methods through which you can recover a post after it gets accidently removed from your site. Following are the few possible ways.
- Restore from Feeds, via text.
- Restore from Search Engine Cache, via text.
- Restore from Search Engine Cache, via Post ID.
The most prominent way is to use Search engine cache to retrieve Post ID from the cached content. By Combining Post ID with Blog ID, you can directly get access to the Blogger’s Post Editor having all the content i.e. text and images which were deleted unintentionally.
Step 1: Find Cache Copy of a Post From Search Engine:
If your post is indexed in Google search engine, then go to Google.com and write the Title of your article (write the full title of your article so search engines can easily display it in the results).

After finding your post in search results just hover over it and a Small arrow will appear as shown in the following screenshot. Just Press that “Arrow >>” and a new window will slide out which will display a small preview of your article.

Now select “Cached” and it will take you to your post (it will display the whole content which was removed) as seen in the screenshot below.

Step 2: Finding Post ID From Search Engine Cache:
Now that you have accessed the “Cache of your article”, the next step is to find Post ID from it's source code. Just press CTRL + U and it will take you to the source code.

Within the source code search for the following HTML coding (Tip: Do not search the whole code at one, just search it in a small set of keywords i.e. <div class='post hentry'>). On finding the code, there’s the unique Post ID 5177832322223143509.
<a name='5177832322223143509'></a>
<div class='bordertop'></div>
<h1 class='post-title'>
How to Publish to Blogger Remotely through Emails
</h1>
Step 3: Accessing Deleted Posts Through Blog and Post ID
Now you have Post ID as well as Blog ID so you can easily recover the deleted article. Just visit the following URL and it will take you to the Blogger editor having content i.e. Text and images which was deleted unintentionally. (Remember: Do not forget to replace the Blog ID as well as the Post ID From the following URL otherwise you would face weird errors).
http://www.blogger.com/blogger.g?blogID=24069595#editor/target=post;postID=5177832322223143509;
That's all, now you can either Publish, Save or update your article that was removed either by you or Google DMCA.
Frequently Asked Questions:
1. How to Find Blog ID?
Each and every site hosted at Blogger has different/unique Blog ID numbers, usually there is no need to worry about the ID, but occupationally you need to know the numbers to install any Third party plugin onto your site. If you need to Figure it out, here's how it goes:
First Login into your Blogger Account, and select the blog whose ID you want to find. Select it from the dashboard, just like you do while publishing a new topic to your site.
From any Page, Template, Layout you can find your blog ID number. Just take a look at your browsers Address bar. See the following screenshot below.

2. Does Anyone can Access My Site's Admin Panel?
No one can access your site except You. If others discovered your Blog ID as Well as Post ID even than they cannot hack or edit your site until or unless their Email Address has the admin privilege. Whenever an unknown person would access your site's admin dashboard it will display an error message i.e. "Your current account (example@gmail.com) does not have access to view this page. Click here to logout and change accounts".

How to Backup Your Blogger Posts and Comments Manually
Being a blogger user, there is no assurance that your blog is safe from removal, that’s the price of using the platform for free. Since, your site is hosted at Google servers. Therefore, if your site does not comply with their Terms and services they will delete your site without even giving a second chance. You may have heard from many co-Blogger users that their websites are getting vanished overnight. As a Google blogger, there is no way of retrieving your deleted blog. The only thing you can do to protect yourself is to take a backup of your site. In this Article, we will show you how to take backup your Blogger Blog.
Probably this is the price of using this platform for free. Just imagine the feeling of a person who spends days and nights in putting up his website, and suddenly Google removes his site due to some violation in terms. Things cannot get worse than that.
How To Backup of Posts, Pages and Images?
To Backup your website go to Blogger.com >> Settings >> Other >> Export your blog. Now a new window will appear, just select the orange “Download Blog” button and a file will be downloaded which would be in “XML” format. That file possesses all the data and details about your blog including posts, images, and pages. The downloaded file can be used on WordPress, or any other popular platform.

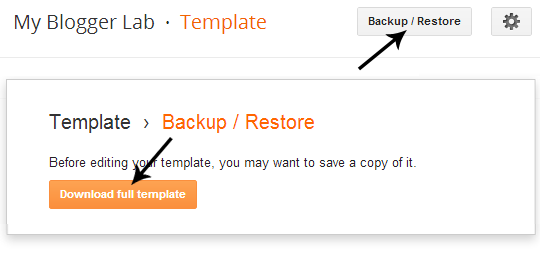
How to Backup Template?
If anyone is wondering how to take back up of their template, then he can go to Blogger >> Template >> Backup/Restore. Now press “Download the full template” button and template is successfully backed up. The downloaded file would be in XML format and it cannot be used on any other platform except Blogger.
That’s all folks, now your blog is successfully backed up. In the future, if your site got deleted, then you can use this back up and can migrate your whole site to WordPress without even losing a single Search engine ranking. By using 301 permanent redirects, we can easily redirect all the traffic to the new self-hosted WordPress site. However, without backup you have to give a kick start to your career once again.
What Are the Limitations of a Blogger.com Account
Most of the people always prefer to choose blogger.com to give a healthy start to their blogging career. The fact is quite clear that first it is free-to-use (no need to spend a single penny over purchasing domain or hosting) and second it is easy to use. The only price that you may pay for choosing this FREE platform is that, it has lots of limitations. Unfortunately, Blogger.com has lots of limitations which we will be discussing in today’s article (What are the limitations of Blogger Account).
Number of Blogs:
You can create 100 different blogs per account. However, in case the limit gets exceeded then Google authorities have the right to not only disable your account but also restrict your access to your blogs. Therefore, always keep in mind that your blog lists does not exceed the 100 mark.
Number of Posts:
Fortunately, there are no such limits for the number of posts. You can create unlimited posts with unlimited content. All the posts would be saved into your account, and they will be there until or unless you deleted them manually. In case you unwantedly delete the posts, then they can be recovered through Google History Cache.
Size of Pages:
Separate pages (the main page of your site, the archive pages and the post pages) are limited to 1 MB in size. This will allow you to add hindered pages of text. However, if you list 100 posts on either home or achieve pages then it might exceed the size limit, and it would display an error message such as, "006 please contact Blogger Support”. You can get rid of this error by decreasing the number of posts on your main page.
Account Suspension:
Blogger has some strict rules and regulations. They suspend a site or even your whole account if it is suspected that you are violating their any terms of service. Once, the site gets suspended then there is hardly any chance of recovering it back. Blogger.com does not send notifications before banning an account, it means there is no warning for the website owner. Once the blog gets suspended the domain would be on hold, and no one can use the same domain again.Number of Comments:
There are no such limits in the number of comments. A Post can have unlimited comments. It depends on you whether you show the comments or hide them from your posts, but the pre-existing comments would be remained saved in your account. You can enable the comments anytime you like.
Size of Pictures:
There is no size limit of a single picture. However, if you are uploading a picture through your mobile or smartphones then it should not bigger than 250K per picture. Remember: 1 Blog has 1 Gigabyte of FREE image hosting.
Length or Size of Posts:
There are no such limitations for the length of the individual posts. However, if your posts are too long then they might exceed the page Size Limits (See the next point to elaborate the size limitations).
Number of Stand-Alone Pages:
You can only create 20 Stand-Alone pages per blog (example of a stand-alone page: http://www.mybloggerlab.com/p/advertise-here.html).
Storage Limit of Pictures:
The storage limit for pictures is 1 GB (Gigabytes), which are linked to your Picasa account. Even if you delete them from your pages it would be still available on your Picasa Account.
Number of Labels:
You can create 5000 unique labels per blog and can use 20 unique labels per post.
Team Members:
You can add up to 100 members per blog.
Conclusion:
We would recommend you to continue using this FREE platform, but make sure you get rid of BlogSpot domain and transform it to .com because it has much more flexible options. Incase Google delete your site due to some policy violation then you can move your site to WordPress. However, if you do not have a .com Domain then you would be left empty handed. Now the decision is yours either take it or leave it.
Why You Should Use Blogger
Blogger is the only free and robust content management platform but in spite of getting the credit and appreciate people always degrade it for its sluggish and rusty behavior. Have you looked at blogger lately? 7 years ago it had just 250,000 active users, but today it is the only platform which has over 400 million active users. That’s more than the entire population of South America. Over the past couple of years, Blogger has evolved as a versatile CMS platform. We have seen that many top industries like Twitter is using blogger platform to host their content. It is not just an ordinary a platform. It is a powerful tool with robust features. We have collected a few reasons that why you should use Blogger, What are its key features, And Why Blogger is better than others.
Why You Should Use Blogger?

Blogger a Free-to-use Platform:
Blogger is an open source platform, it other words we can say it is free. Unlike others there is no need to purchase hosting because blogger sites are hosted at Google Servers. It can be used for any purpose either personal or industrial without any cost.
Who would wish to pay thousands of dollars in buying a CMS platform which almost has the same features as Blogger? Why a person would hire a developer if he knows all the skills himself? Many CMS companies require a yearly license which means you have to pay them a hand full of money every year. On the other hand, Blogger is free from such limitations. It even does not force you to put their backlink in footer. However, some die-heart fans like us link back to show our appreciations
Professional Templates Support:
You would never feel difficulty in finding a Free Template for your site. Blogger has a wide range of free themes collection. If you are unable to find a proper theme, then you can check out some free professional themes developed by over developers at Templateism. However, if you still did not find a free theme then you can hire us to develop a robust theme for your site at reasonable rates.
Comprehensive Widgets:
Blogger uses widgets and plugins that help you to build a better and healthier site. It has a wide range of free Widgets inventory that enables us to add more spark to our site. There are some reputable developers like us who keeps on developing new widgets to keep this platform alive. You can access our Widget inventory or can even request us to develop any plugin that you need.
Almost ZERO Downtime:
Pingdom quotes once “Since Blogger was the only service with zero uptime at all. We skipped the chart here. We hope you did not mind. It simply would not have that interesting”. We do not have to prove that it is the only platform which has zero downtime. It gives to stability and you can always relay with your eyes close.
User friendly Interface:
You do not need any developing skills to use blogger on your site. The whole interface is not complicated at all. From the dashboard to the setting panel everything is arranged in a systemic manner so that a beginner would not feel any difficulty while using it. Aside from basic use tweaking and modifying the skins is fairly straightforward as well. Richy Code has tons of free tutorials so users can learn every bit of it.
How to Enable Free HTTPS SSL Certificate in Blogger

Are you looking to add some extra security measures to your blogger site? Are you worried about your blogger blog getting attacked from malware? With Blogger's Free SSL certificate service, now you can protect your blogger site and your visitors by adding an extra layer of security. Moving from HTTP to HTTPS and installing an SSL certificate to your blogger site is fairly simple. In this article, we will show you how to enable free HTTPS SSL certificate in Blogger.
What is SSL Certificate?
SSL stands for secure socket Layer which increases the security between a website and a user. We daily fill online forms, shop products online, and numerous other things we do to send our information to the web servers. In order to protect the data transfer we need a secure connection.That's where SSL Certificate provides that matters. HTTPS connection, establishes an encrypted connection between a user and a web server, so hackers do not get access to the information of a particulate user.
Every site has a unique SSL Certificate this helps in identifying secure connection. Any site that is pretending to have a secure SSL, HTTPS connection and its certificate does not match, and then your browsers will give you the following warning message.

Why you should use SSL?
When it comes to search engine ranking, Google gives more importance to HTTPS sites than HTTP sites. Having a secure connection gives a stronger message to the search engine that you give importance to your site security.This is the reason why sites which have a secure connection might run a little better than the other sites which doesn’t have a secure SSL connection.
How to Enable FREE HTTPS SSL Certificate in Blogger
Roughly, a basic SSL certificate costs about $10/year for each site. Luckily, blogger offers a free SSL solution to its blogger users. Unfortunately, blogs with custom domains does not support this feature only free domains can have free SSL certificates.- To Enable HTTPS, sign in to Blogger and select a blog on which you would like to enable HTTPS.
- Go to Settings >> Basics >> HTTPS Settings.
- In HTTPS Availability, select YES

We hope this tutorial may have helped you in learning how to add a Free HTTPS SSL certificate in blogger. Sadly, this feature is only for free. BlogSpot domain and not custom domains. However, we will surely bring away soon that will allow custom domain users to have free SSL certificates as well. If you like this article, share it with your friends and let
4 Easy Tips to Edit Photos for your Blog Posts

Do you want to add photos to the content on your blog? Snapping photos is relatively easy nowadays, but if you want them to look good you need to also be able to edit and improve them afterwards. In this article we will show you 4 easy tips to edit photos for your blog posts.
That is a big stumbling block for many bloggers – as odds are you have little or no experience with editing photos. The good news is that even if that is true, there are a few easy tips that you can use to edit photos for your blog:
1. Correct the white balance and improve the colors
Have you noticed that the colors in your photos are a little bit off, or have a slight blue or red tint? In most cases that is due to the white balance being off, which is why it helps if you correct it.Although it may sound involve, correcting the white balance is really quite easy and most photo editors have automated tools that you can use. If you want you can adjust the color settings manually, to improve the colors further and make them look more vivid.
2. Use the rule of thirds when cropping the photo
Another easy tool that you can use to improve photos is the crop tool. It will remove a section of the frame from your photo, allowing you to adjust and reframe it as you see fit.To get the most out of this tool, you should use the rule of thirds when you crop your photo. It basically requires you align the subject and other elements based on a three by three grid so that your photo has a greater visual impact and is more balanced.
In some photo editors the crop tool has a built-in grid that will make it easier to use the rule of thirds. If not you may have to enable it in the settings.
3. Try a minimalistic look
Minimalism is a good way to create photos that are interesting and place the focus entirely on the subject. However if you’ve already snapped a photo that isn’t really very minimal you’ll have to rely on editing to create a more minimalistic look.Learning how to change the background of a photo and remove unwanted elements will be necessary to do that. If possible, you should try to find a photo editor with tools to make it easier to do both those tasks, such as Movavi Photo Editor.
4. Apply the same filters consistently
Overall you should try to make sure that the photos on your blog have a similar visual style – and filters are an easy way to do that. By picking out a few filters and applying them consistently on the photos for your blog, you can start to build a visual brand.The exact filters that are available to you will depend on the editor that you’re using, and some may allow you to download or add custom filters as well.
At the end of the day the best way to start getting better at editing photos for a blog is to get more experience. The tips listed above should provide you with a great set of ways that you can begin to use to edit your photos – and will allow you to begin to get more experience as you use them.
That being said it is important that you don’t shy away from exploring, experimenting, and trying other editing techniques as well. At the end of the day the more you try out new ways to edit your photos, the faster you’ll be able to improve and hone your skills.
How to Remove Locked Widget in Blogger

If you have ever tried a blogger template that is developed by a third-party developers like templateism, then most probably you might have encounter a kind of locked widget in the blog’s layout section are which cannot be removed. As remove button is missing because the widget is set to locked which makes it not removable. You might have tried hard to get rid of such widget, but couldn’t succeed. Today in this article, we will show you, how to remove locked widgets in blogger.
Now a window will appear, in the address bar look for widgetid=. It would be towards the end of your widget address. For your help we have attached a screenshot below:

After finding the widgetid copy it in a notepad for further usage in the tutorial.
Now go to Template >> Edit HTML >> Jump to Widget and then select the ID of your widget (which you’ve coped in above step).

After that it will take you to the coding of your widget,then you need to make little changes in the coding of your widget as give below. To make it more straightforward, change Locked=’false’ to true. Refer the below screenshot for more clarity.

Now click on Save Template.
Now go to Layout and again open the locked widget, And you will be able to see the Remove button on the widget. Simply click on Remove button to remove the widget.
You are done!
This was our tutorial to make you guys aware with the process of removing locked widget. We are hopeful that it would have been proven helpful for you guys. If you have any queries left related to this issue then lend your queries in comment box. Any of our team members will address your queries.
How to Remove Locked Widget in Blogger
The very first thing you need to do is to find out the unique Widget ID of the widget you would like to remove, so go Blogger >> Layout >> Open the Widget which you want to remove.Now a window will appear, in the address bar look for widgetid=. It would be towards the end of your widget address. For your help we have attached a screenshot below:
After finding the widgetid copy it in a notepad for further usage in the tutorial.
Now go to Template >> Edit HTML >> Jump to Widget and then select the ID of your widget (which you’ve coped in above step).
After that it will take you to the coding of your widget,then you need to make little changes in the coding of your widget as give below. To make it more straightforward, change Locked=’false’ to true. Refer the below screenshot for more clarity.
Now click on Save Template.
Now go to Layout and again open the locked widget, And you will be able to see the Remove button on the widget. Simply click on Remove button to remove the widget.
You are done!
This was our tutorial to make you guys aware with the process of removing locked widget. We are hopeful that it would have been proven helpful for you guys. If you have any queries left related to this issue then lend your queries in comment box. Any of our team members will address your queries.
Subscribe to:
Comments
(
Atom
)